It was one of those days. I wound up getting more tools out of the workshop that we filled half the tractor's trailer by the end of the day.
The day started normally enough, I cut down the 8' 4"x4" railing posts to two 4' posts. The lumberyard guy recommended using rough cedar posts even though the radiance rail will cover it. He explained that they have seen pressure treated posts crack and split the radiance rail post covers, sounded good to me, so cedar it is. My Dad was coming over and I figured drilling holes for the posts in the cooler basement workshop would be a good thing for him to do. I realized that the lumberyard had sent one too many 8' posts. . . after I cut it in half.
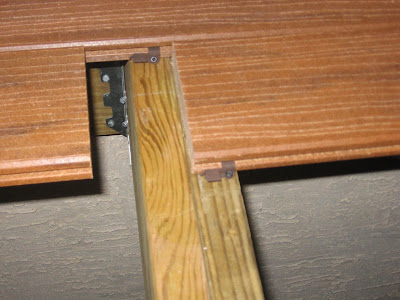
I'm using TimberTech's CONCEALoc hidden fastener system. The fasteners clip into a groove in the first deck plank, after which the clip is screwed down to the joist. The fastener has a second tang that (theoretically) receives the next plank. The process then continues with subsequent boards.
The fasteners require extra framing material wherever the deck planks have butt joint, so I moved on to attaching pressure treated 2x4s to the side of the joists. I took my time with this as any misalignment between the joist and the 2x4 would mean that the two deck planks would be at different heights at the joint and people would be tripping on it for years.
I then started moving the deck planks from the delivery pile to the deck. My planks are 12', 16' and 20' long and weigh about 3 pounds per foot. The 20 footer weighed a good 60 pounds, and of course these planks had to go the furthest from the pile. I moved enough planks to create a walkway. I also moved enough planks to know that I should wait for my son to get home from NY before I moved any more. If you are building a deck with TimberTech decking, here's a tip. Their planks will have a small groove (not to be confused with the groove to accept the CONCEALoc fastener) along their length. In a video on their website, they tell you to orient these grooves all in the same direction so that all planks will have the same appearance. I didn't realize this until after I plopped a thousand pounds of deck planks down on the deck. And yes, half of it was oriented in the wrong direction.
I snapped a chalkline to lay down the first board and found two joists that needed to have their height adjusted. I'm still not sure how I missed these two joists earlier, but it required pulling the nails from the ledger trusses and adjusting their heights.
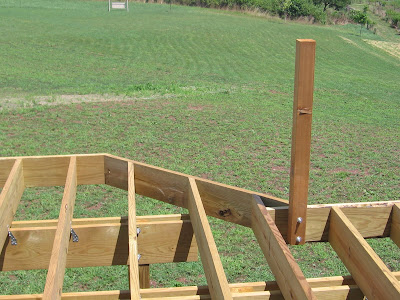
I attached one of the posts near the house so that we knew where to notch the first deck plank. Had some minor issues with the length of the drill bit + length of the drill being greater than the available space. Probably shoulda' drilled from the outside instead of drilling the posts on the drill press in the basement, but at least my holes are plumb. Got the post installed and Dad asked "Don't we want to counter sink the heads of those carriage bolts so they don't interfere with the Azek fascia?" The post had to come back off.
I put the first row of boards together and found that the factory cuts on the planks are not square! The resulting butt joints would look terrible and meant that we would have to trim each end. I created a makeshift table to hold the chopsaw off the edge of the deck. The table is screwed to the edge of the deck, allowing the deck boards to be slid right onto the chop saw bed.
We started to attach the second plank to the first rows CONCEALoc clips. In the TimberTech installation video, you hold the plank at a 45 degree angle, place the plank onto the clips, rotate the plank and you are pretty much done. In real life, the planks did not go onto the clips at all. The planks are not perfectly straight, nor are all the joist heights, which leads to the planks falling out of the clips. I wound up using two wedges, one which was screwed to the top of the joist to force the second plank onto the clips. I had to repeat this every three joists. After doing one board this way, Dad and I figured it was time for dinner (thanks again for dinner Dad!).
I think I'll work on attaching 4x4 posts tomorrow.
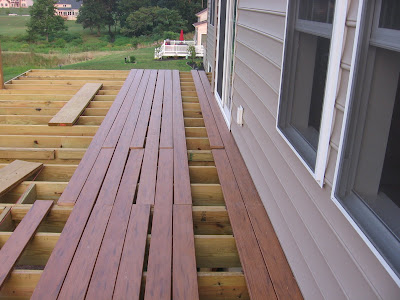
 I had loaded nine rows of planks this past Saturday, we loaded another fourteen rows tonight.
 Tomorrow we'll start attaching some of these planks and attach some posts , weather permitting.
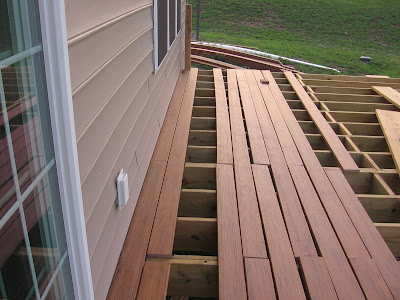
 After getting the blocking in place, we attached another plank using the CONCEALoc fasteners. I have come up with a home made tool to squeeze the planks together, but for the first two rows of planks I can't use it due to it being too close to the house. Consequently I had to use a pair of wedges, one of which was screwed to the top of the joist, to bring the planks together.