Thursday, August 28, 2008

Gone Fishin

Well, the deck project has been put on hold.  I'm taking the next two weeks off for some time away from the project.  Check back on September 10th when we get back to work.

Sunday, August 24, 2008

Now I know where my mother gets it from. . .

My mom dropped off a letter written by my great-grandmother to my grandmother Dorothy (my mom's mom).  Apparently Dorothy, at age 17, had gone to the beach with a friend and received the following instruction:

Phila  July 4, 1934
Dear Dorothy,
Just a line to let you know that we arrived safely home at 8 o'clock.  we did not rush, but there were more traffic and you could not make very good time.  I hope that you and Merlyn will enjoy yourselves but don't stay in the water too long or go out far, and keep away from the pilings & try and watch & don't loose anything and take care that you lock the door & not loose the key & don't go in the water with any of your rings on or your watch & be a good girl.  Help Hannah and Robert with the work. and clean up your own dishes & dust-up the floors a bit when you see the need it.  and if every thing is alright & everybody well, we will do down for you on Sunday morning.  So good night & best regards to all.
Your loving Mother

This explains a lot. . .      :-)

Saturday, August 23, 2008

The bricks have landed. . .

My son was not feeling well today and spent the better part of the day in bed.  My dad came by around 9 AM and was a great help.  Thanks Dad!

The morning started off by leveling the first course of bricks.  I had purchased two pieces of 1/2" black pipe last night to screed the sand and make everything level. After placing the first course of retaining wall, I filled in with crushed stone.
The second course of the retaining wall went in quickly.  I used some construction adhesive to bond the two layers of the wall together.  Once the middle was filled in with more crushed stone to within two inches of the top, I filled in with a course sand first and tamped it down.
After tamping the course sand, I then used leveling sand to create a sturdy base for the brick pavers.  I also used construction adhesive to mate the bricks to the paving wall.  When all the bricks were in place, I used polymeric sand to fill the gaps between the bricks.  I found that some sand was escaping along the back and left edge, so I used a small bead of adhesive to fill the edges.  This worked well and was not noticeable.  
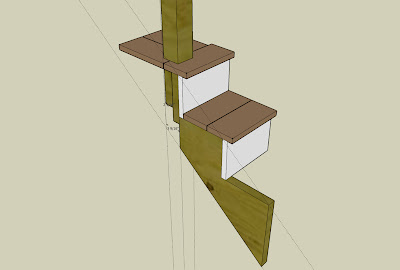
The brick landing took the better part of the morning.  In the afternoon, it was back to SketchUp to tweak the stair stringer details now that I had the exact landing to deck height.  

Once the details were set, we set up in the garage and started cutting the stringers.  Had to go to Lowe's to get a 2x12 when I found that one of the lumberyard stringers was cracked beyond use.  I had to cut my own stringers because the store bought stringers didn't have enough rise to reach the deck from the ground.  A second advantage was that my stringers are attached under the deck instead of hanging a second piece of wood under the joist to catch the stringer.  It looks a whole lot better in my opinion.
We decided to call it quits once the stringers were in place.  I'm behind schedule from where I wanted to be at this time, but I'm meeting another one of my goals - enjoying the summer.   Despite being behind, I'm feeling good about the progress and don't want to rush the finish details.

Friday, August 22, 2008

The value of living near home. . .

One of the great things about being close to family is the ability to get together for things that we would never make a 5 hour drive for.  Last night we got together for dinner with my wife's side of the family for a dual birthday party (my son and my sister-in-law).  The weather, food, and time together was all great.


Thursday, August 21, 2008

In the category of "it's taking longer than it should. . . "

At the bottom of the steps, I am creating a brick landing for folks to step off onto.  As I mentioned before, the ground is sloped where the steps hit the ground. A level pad would ensure that folks wouldn't lose their balance at the bottom of the steps.  

This past Saturday I purchased the bricks for the pad - (48) 4" x 8" bricks which would form a 32"x48" landing.  As I started last night, I realized just how much the ground sloped: about 12" from front left corner to right rear.  Clearly I was not going to be able to build up dirt around the pad as I had first intended.  Back to Lowes where I purchased (11) 4"x8"x12" wall blocks. My plan is to build a wall on the rear and right side, fill in the middle with rock then sand, then place the brick pavers on top.

Our soil is dense clay and we spent the better part of the night excavating the hole. The soil was so hard we had to use a 5' iron breaker bar to break up the soil.  After we had the hole to the right depth, we started filling the footers for the wall with crushed rock we got from a neighbor.  We then created our sand bed which I started to level. I test fit three bricks but found them slightly out of level, so I'll get some pipe on my way home tomorrow to screed the sand.  
Taken from the deck

Tuesday, August 19, 2008

Hardware store to the rescue

It's been a slow couple of days with respect to deck building.  Actually, there has been no deck building going on in the last couple of days.  Sunday we went to church and then spent the afternoon with my folks.

I went to the hardware store today to return a couple of unused items and to work out the exchange of the Azek trim.  I had received 10" material but realized that 12" material was needed to cover the edges of the TimberTech planks.  I'm covering the ends of the boards as they are grooved to accept the hidden fasteners.  

While there, I got two packages of extra Radiance Rail fasteners that I needed (see previous post). The good news was that they had the package in stock even if each package of four cost $18.  The person I was working with said that the TimberTech material has gone up in price since I purchased it, and is going to go up another 7% due to high demand and cost of materials.

I hope to start working on the brick pad for the steps tomorrow night.  The dog will be happy about this as she found the 40" leap a bit to high to her liking (after she jumped). 

Monday, August 18, 2008

Called TimberTech regarding mounting brackets

Because I am splitting an eight foot section of radiance rail into two four foot sections, I needed four additional mounting brackets.  These brackets attach the upper railing to the vertical support posts. The company representative said I'd have to go to the dealer/lumberyard to order more mounting hardware.  They don't sell or ship to a non-dealer. 
Bummer.

Saturday, August 16, 2008

Railings - the sequel

Today we got done all the railings installed with the exception of the steps!  It feels really good to have the deck closed in.  We used one 8' package of radiance rail to create two 4' sections of railing.  The only problem with this is that TimberTech does not include enough mounting hardware for two railing sections.  We improvised to get things completed.  Still, I'm going to call TimberTech on Monday to see if I can get some additional hardware as I'm planning to cut another 8' section in half for the steps.
I had to make a trip to Lowes in the morning to get a few things including bricks and sand. I'm going to create a 3' x 4' landing when you step off the stairs.  While code allows the steps to land directly onto the dirt, the ground slopes.  I don't want to see someone fall at the bottom of the steps due to the ground being uneven.  

After the railing went up, we started laying the groundwork for the steps by cutting the planks into 4' lengths.
Due to other chores needing attention around the house, we quite the deck work mid-afternoon.  Before we quit we brought the patio table and umbrella up onto the deck to see how things looked.  The table fits well into the bumpout.

Friday, August 15, 2008

No Rain!

The weather guessers were wrong.  What was predicted to be a washout today was actually 5 minutes of sprinkles around 4 PM.  The result was five more sections of railing put up.
Two more sections on the end will cap off the main portion of the deck.  We had to knock off early because of a sporting event my son was involved with.
After those two sections, it's stairs and white Azek fascia trim.

Thursday, August 14, 2008

Working the Railings

The weather has not been great as of late.  I took the sunrise picture on Sunday morning.  Red sky in morning, sailors take warning goes the saying.  Or maybe it should be deck builders take warning.
We've had several days and evenings of rain unfortunately. Wednesday night I was able to attach one section. Getting all the tools out on the deck is half the battle so I decided to take over the area inside the door to the kitchen and stage tools there for the next couple of days.
Completing the second rail section last night section was somewhat difficult. There was nothing different from the first section that I put in, but mentally my head was not into it. I cut a support piece short which I was able to correct, but the rest of the night was measure six times, cut once. . .

Tonight was smooth sailing and the third railing section was installed in about an hour. Once we installed the third section, the skies were threatening and I had to break down. It started raining almost immediately after we got things in. 
I have tomorrow off. Hopefully the weather will cooperate enough to get work done. Three sections done, nine to go.

Some tips if you are installing TimberTech's Radiance Rail:
- My lumberyard recommended using rough cedar for posts because they have seen pressure treated material crack the post covers.
- Start with a rail section that will give you a good size piece of leftover piece of top and bottom rail.  Use the scrap rails to test fit the rail to post joint.  This will allow you to determine the angles to cut the rails, leaving a tight joint between the rail and the post.  Generally I had to cut the rail either a half or whole degree one way or another.
- As you get more scrap pieces of railing, mark the scraps with the angle they are cut at.  This will allow you to quickly figure out what angle you need to cut the rails at.
- Cut your rails slightly long, check, then trim an 1/8" off the rail.  Repeat this process until you have reached the correct length.  The top and bottom rails should be very tight to the posts to have a tight joint.
- Work hard to ensure your posts are plumb.  If your top and bottom rail are different lengths, your posts are not plumb.

Hopefully I'll have lots of pictures tomorrow.

Saturday, August 9, 2008

Deck Planks are on, trimmed, and retrimmed.

The morning started with a dilemna.  I had three boards to attach.  Unfortunately the deck was 3 boards plus an extra inch deep.  I kicked around several different options.  I decided to take off the rim joist, cut an inch of each of the joists at the edge of the deck, and reattach the rim joist.  It took about two hours.  

Some folks start attaching planks at the edge of the deck and work their way towards the house so that they will have a full width board at the edge of the deck.  Esthetically, I can't disagree with this approach.  I didn't do this as I didn't want a sliver of a plank at the house.  I also knew my deck was square and parallel.  Fortunately for me it worked out that I have full width boards at the house and at the edge of the deck.
Once we got the rimjoist attached we attached the final three planks.  Everything fit together perfectly.  After lunch, we started trimming all of the edges of the planks.  My dad asked if I wanted a straightedge to use as a guide.  Nah, I'll free hand it I responded.  About halfway through the cut I realized that I had drifted off the line. . . in the wrong direction. . . towards the center of the deck.  It looked as though at least one board was ruined. . .  Dad realized that we could sledgehammer the opposite end of the bad planks to slide the bad cuts over the opposite side.  This worked like a charm and we were back in business. I then recut the bad section.  We used a straightedge from there on.

My son couldn't wait to get the post sleeves on the posts and put all the caps on.  Each one will have to come off to get cut down to 39.5".  Still, I'm glad he did it.
By this point, we were ready to start attaching the railings.  We had accumulated quite a bit of stuff on the deck by this point, so we did some clearing.  I've been throwing all my tools in the trailer of my riding mower.  It's getting pretty full by now.  We then laid out the tools that we needed to start attaching the railings.  

The first section of railing always goes up the slowest.  Getting the right tools and understanding the right order of things slows things down, even if I have used this product before.  We were determined to get one section done before we quit for the evening.  We got this first section done after dinner and cleaned up around 7 pm.  One section down, eleven to go!

Friday, August 8, 2008

Great Customer Service. . .

I woke up at 3 am today.  This is early, even for me.  I've been having some tendonitis in my left arm lately, and I forgot to take some Advil before I went to bed.  I must have laid on my arm because it was sore and woke me up.   

The workday started with a visit from the warranty representative of our builders to start the drywall repair.  He came and went throughout the day applying a coat of mud and sanding it when it was dry.  He has to come back next week to finish the mud job and apply paint.
Dad came by around nine o'clock.  He started driving some screws on the deck when I wasn't looking.
We started on the bump-out and worked our way out.  After attaching several planks, we found that we were one 20' plank short.  Ugh.  The one remaining 20 footer was pretty scratched up, so I figured that I would exchange it.  I looked at putting it in or on top of the mini-van, but the board was longer than the van and too flexible to go on the roof.  I called the lumberyard A. D. Moyer where I purchased the material to see if it would be possible to get a late day delivery and exchange. Frankly I didn't think that it was going to happen.  At four o'clock the truck rolled up and dropped off the material - at no charge.  Awesome customer focus!
While we waited for the material to finish up the bump-out, we moved to the house side and wrapped up the inside 2 foot section.  There was some cutting and tweaking involved, so we took our time here.  Once we got this section done, we started trimming the board edges with the circular saw.  Fortunately I noticed that one CONCEALoc fastener was hanging slightly over the edge of the joist before I started cutting. This would have wrecked the circular saw blade I had just purchased to cut the deck edges. I had to attack this with a jig-saw and a metal cutting bit.  Actually 2 metal cutting bits, the fasteners are pretty tough stuff.
Mid afternoon we had a rainstorm which had us clear everything off the deck.  The rain lasted 10 minutes, then the sun came out again.  We were able to get back to work shortly after it stopped.
Tomorrow we will attach the last three planks, trim the edges, and start with the Radiance Rail sections.  There are 12 sections of railing that will need to go up.

Wednesday, August 6, 2008

Four Day Recap

This past Sunday was a beautiful day, low 80s, low humidity.  We went to church in the morning.  In the afternoon, I took a nap.  A nice long nap.  I didn't do anything on the deck except sit on it.  It was a great day of rest.
Monday evening, my son and I worked on the deck attaching more deck planks.
Tuesday night, it rained cats and dogs.
Tonight, my son and I attached another two posts and built the deck out to the edge of the posts in the main section of the deck.  We have one more board to connect on the outside of the posts tomorrow night.

We have two more sections to complete:   
   The two foot deep section by the house.
   and the 4' deep section in the bumpout.  This area starts at 20' wide and narrows to 12' wide. There will be no butt joints in either of these two sections so the work should go quicker than the main portion of the deck.
I've got Friday off, so what we don't get done tomorrow night, we'll complete on Friday.  After that we'll trim the edges of the planks to be flush with the joist edges and then move on to the Radiance Rails.

Saturday, August 2, 2008

Walk the plank(s). . .

It was a good day today in between and after the rainstorms.  I got started around 8 am with attaching more planks.  This continued throughout the day.  Twice we had to quickly throw all the tools into the riding mower's trailer and pull them into the garage when heavy rain rolled in. Fortunately as quick as the rain came in, it blew out.  Both times I mopped the excess water off the deck, the sun dried things out, and we were back to work within an hour of pulling things off the deck.

As is becoming a good Saturday tradition, my Dad came over to supervise, this time with my Mom as well.  The day pretty much consisted of attaching the planks to the deck.  Work around the steps slowed things a bit, but by the end of the day the main part of the deck is about two thirds complete.  We knocked off at 5 pm for a steak dinner.
We couldn't resist putting a couple of patio chairs up on the deck to try it out.  
I'd like to get the remaining planks installed by next Thursday so that next weekend we can focus on getting the railings attached.

Friday, August 1, 2008

As expected, I woke up before 5 am this morning.  After having my cup of coffee and sorting through some emails, I got to work on figuring out step details.  On my last deck project in NY, the steps took way longer than they should have.  Using Google's free Sketch-Up CAD software, I was able to draw up the details I needed in about a half hour.  It's a pretty amazing tool.
We had a scheduled visit from the plumbing company to fix a problem with the master bath tub.  When the master toilet was flushed, it would suck the water out of the tub's drain line and allow septic gases into the house.  It turns out that it was plumbed wrong and didn't vent the tub properly.  Unfortunately, they had to cut several holes in our kitchen ceiling to fix the problem.  The builder's handyman will be coming next week to do the drywall.  This is going to be a tough drywall job as it is in the kitchen ceiling and will be easily seen if not done well.
The plumber left around noon.  After lunch my son and I started with installing the two posts around the steps and then installed some additional wood blocking to support the steps.

We then started attaching the planks.  I came up with a way to pull the boards together by using an 18" piece of 1/2" pipe, a Bessey Pipe clamp from Lowes, and two metal trusses screwed to a 2x4.  This setup worked so well that we went out and got a second pipe clamp from Lowes.  Precut and threaded 1/2" pipe - $3, 2 Trusses - $4, Clamp - $12.  About $40 for the two clamps.  The CONCEALoc fasteners are working well now that we have a method to seat the planks onto them.We got several courses of planks attached before we broke for dinner with wife's sister and family.  I continued on after dinner.

Tomorrow we will be laying planks all day long.